John Beale (July 2001- April 2004)
I got a Pioneer DVR-A03 from profeel in July 2001. After that (Dec. 2002) came the DVR-A04 and DVR-A05, which are similar except the A05 can write at 4x (but only on DVD-R blanks marked as "4x" speed). In May 2003 Pioneer announced the DVR-A06 drive, which also features DVD+R and DVD+RW, and in Nov 2003 they announced the DVR-A07 which can write DVD-R at 8x speed. I got an A06 drive which works well.
Warning: In June 2004 I got a Sony DRU-700A burner which consistently produces unreliable DVDs (5 for 5) using premium 4x Taiyo-Yuden DVD-R media, even with the latest firmware (VY05). Each one freezes in the same spot on my Yamakawa DVD-218. Same program, same media, same player is perfect (3 for 3) when burned with the Pioneer A06. I recommend you avoid the Sony drive (actually a Lite-On SOHW-832S).
You can buy a DVD writer from videoguys, meritline or most local computer stores, and they're a lot cheaper than they used to be.
The A03 and later drives write on DVD-R and DVD-RW discs. The unit goes into your computer just like a IDE-interface CD-R drive (which in fact it is; in addition to DVD-R/RW it also writes CD-R and CD-RW). Installation of the drive was easy and fast, and the hardware works flawlessly. However, the process of preparing files in the necessary format for writing a valid DVD (the so-called "authoring" process) is not so simple.
So far I have made several 1.5 hour-long DVD productions of dance performances, and also some compilations of shorter projects I had done earlier. For a description of the DVD format and what is capable of, see the bottom of this page. I describe the steps involved in my own DVD production process below.
Note: The files on a DVD disc have the same format regardless of the operating system you use to create them, and also what media you write them on (DVD-R, DVD-RW, DVD+R etc). I am using a PC running Windows 2000. If you are using a Mac, from what I've heard, the Apple DVD authoring software is much less complicated to get working than what I have illustrated here. I am not familiar with Macs but there is a Mac-specific DVD authoring forum on 2-pop.com. Apple also used the Pioneer DVD-R drive (then called the DVR-103 in the OEM version) in its first DVD-capable computers in 2001, and as far as I know is continuing to use the Pioneer brand DVD-R drives.
How to Make a DVD
0) Shoot your video. Use the best camera you can, because any noise in the video image will be accentuated by the MPEG2 encoding process. If you can, reduce the "sharpening" in the camera. Most consumer cameras have fixed, built-in sharpening process which looks fine when you make VHS copies, but is less desirable when encoding for DVD.
1) Transfer video on MiniDV tape from camera to computer over Firewire (I use the Canopus DVRaptor card, although cheaper options exist). Large hard drives are useful here; I have two 80 GB Maxtor EIDE drives in a Promise FastTrack100 TX2 array. I see about 50 MB/sec read and write using the Canopus drive test utility.
2) Edit various camera angles together with your video editing software. I used to use Adobe Premiere, but now I prefer Sonic Foundry Vegas 4. Another possibility is Ulead MediaStudio Pro. Most of the new NLEs (non-linear editor = computer video editing) permit you to export your video as a MPEG2 directly using a built-in encoder. This can be convenient, however I prefer the flexibility and control of saving the file as a DV AVI format, and encoding separately. Previously, I had to save each AVI block of about 8 minutes separately, due to a limit of 2 GB per each AVI file. On Windows 2000 with NTFS filesystem (and type 2 AVI files) this is not necessary.
For MPEG2 encoding I use a separate encoder program, see (3) below. It is possible to use external encoders as if they were built-in to your NLE using the Debugmode PluginPac Frameserver for Vegas, Premiere, and MediaStudio Pro. There is also a "bridge" program called Premiere Video Server, described here.
In general I have found the built-in MPEG2 encoders with most NLE software are reasonably fast, but do not generate optimum quality. The program bundled with the DVR-A03 (Sonic MyDVD) can encode MPEG2, but generates disappointing quality video, and is extremely slow as well.
A note on contrast: DV from a MiniDV camcorder, MPEG2 for DVD, and the ITU-R BT.601 (formerly CCIR 601) standard they are based on all specify a digital video brightness level of 16 for black and 235 for white, rather than the 0..255 levels common for computer graphics, JPEGs from digital still cameras, etc.
In CCE, under "Encoder setting->Advanced [Video...]-> "Luminance" you can select [16 to 235] or [0 to 255]. The first setting reduces contrast; the second setting makes no alteration to your levels. For DV material, choose the second setting [0 to 255]. If you choose [16 to 235] the program will assume you've got the full input range (black = 0) and will compress your contrast so your output black = 16, but if you had DV to start with your output blacks will be too light. TMPGEnc has a similar feature: MPEG Setting->Quantize matrix->"Output YUV data as Basic YCbCr not CCIR601" which should be checked assuming DV input source. You can also manually tweek levels with a fine degree of precision using a filter within the TMPGEnc encoder: here's how. With other encoders you're on your own. For more technical detail see the pages at adamwilt.com on Black Levels and White Clip.
3) Convert AVI to MPEG2 with an encoder. (As noted, you can skip this step if you use the built-in encoders.) Warren Young has a review of MPEG2 encoders and other useful information. I have used a few encoders I like: TMPGEnc, CCE Basic, MainConcept, and Ligos LSX-MPEG. The Canopus Procoder does a very good job, but it is about 10x as expensive. TMPGEnc is a standalone program, as is Cinema Craft CCE Basic and MainConcept. LSX-MPEG is sold as either a standalone encoder or an Adobe Premiere plug-in, and is also bundled into Ulead MediaStudio Pro 6.5. The MSP version I have has very few options, so there is little more to describe.
The TMPGEnc program has a huge number of configurable options, start with the provided DVD profile and tweek to suit. vcdhelp.com has some explanation of the parameter settings, and here is a paragraph about the noise reduction filter. The TMPGEnc noise reduction - time axis (temporal filter) does not visibly affect any single frame much, but enables a more efficient MPEG2 encode for noticibly better output quality at any given bitrate. Highly recommended. You can also use an external pre-filtering program if your encoder doesn't offer it, for example virtualdub is quite useful. avisynth is even more powerful, but takes some time to learn.
Bitrate of the encoded video is the most important factor for video quality. Too small a bitrate will give bad quality, but too high may give you a file too large for the DVD. Here is a bitrate calculator from dvd-hq.info to help (that page has quite a bit of useful information). I suggest you avoid maximum bitrates above 8000 kbps for best compatibility. For example 8500 kbps can cause rough-looking playback with many small glitches, if it doesn't actually lock up the player. Yes, if you are making a "replicated", pressed commercial DVD you can go up to 9800 kbps, but DVD-R or DVD+R media is simply not reliable at the higher rates on many players, especially older ones.
TMPGEnc has the option to de-interlace, but I keep the video in interlaced mode, for best playback on an interlaced TV. One person said that only the older TMPGEnc 12a from jamsoft.com worked with their DV AVI files, but the current TMPGEnc from the official site works well for me.
Note May 1, 2002: The Ligos LSX-MPEG plug-in for Premiere is much faster than TMPGEnc and the quality is at least as good IF you don't tweek TMPGEnc's settings. In Ligos I set VBR mode with 8000 kbps max, and 7000 kbps average (or less, depending how much video I have to fit on the DVD). If you do tweek settings, in particular brightness/contrast and temporal filtering, I find TMPGEnc can look better, and with the video server program it can be used like a Premiere plugin also.
Audio. DVD audio is always sampled at 48 kHz, either uncompressed 16-bit stereo PCM (1.536 Mbps), or compressed (MPEG1 layer 2 or AC-3) with a maximum bitrate of 384 kbps. Technically, a NTSC DVD title must have at least one PCM or AC-3 soundtrack to be compliant with the DVD standard, but in my experience, any DVD players that you can buy today can play MPEG1 audio. I have been told that a few DVD players do exist which don't support MPEG1 level 2 audio. I find that Linear (uncompressed) PCM takes too much of the available bitstream, affecting achievable video quality and playback time. Before 2003 I used MPEG1 layer II audio on my DVDs, but no longer. AC3 (Dolby Digital) encoding is better for playback compatibility as well as audio quality for any given bitrate, but it was too expensive for consumers. Fortunately, now Vegas4+DVD offers AC3 as well as Ulead DVD-Workshop through a separate AC3 plugin. There is a freeware program called BeSweet that generates AC3, but I found its output had playback errors. If you want to try it, there is a guide at dvdrhelp.com.
Here is the TMPGEnc parameter file I used for one DV->MPEG2 encoding project for DVD. You will need to adjust the noise reduction filters and brightness and contrast settings to suit your own material. This is quite important; it makes the difference between mediocre and superior video quality. This page about SVCD encoding has some generally useful information about TMPGEnc as well.
4) Optional. If you encoded many separate files, you can combine individual MPEG2 files into one longer program, using the TMPGEnc command
File->MPEG Tools->Merge & Cut.
5) Authoring. Use a "DVD Authoring Tool" to make the final DVD image on your hard drive. In the past this has been tricky, but the authoring software has been improving a lot recently.
I have tried Sonic MyDVD and DVDit, Spruce Technologies SpruceUp, MTC2000 DVD-Motion, Authoringware DVD Junior, ULead DVD Workshop and DVD Plug-In, Sonic Foundry DVD-Author, Mediachance DVD-Lab and Pegasys TMPGEnc DVD Author. I believe that DVD Workshop is currently the best choice among these programs for most users. It has a good user interface and comes with a number of pre-built menu and background templates. It has a built-in preview mode to test-play your disc, navigate menus etc. prior to encoding. It also has a built-in video capture mode and MPEG2 encoder, which works well (but normally I use TMPGEnc or CCE as described above). The current DVDWS ver1.3 can play back AC3 audio (see this note) but you need a separate AC3 plugin pack to encode your own AC3. As of Summer 2002, DVD Workshop was available for free 30-day trial at Ulead's website.
The other choices: DVD-Lab is the new kid on the block- inexpensive and many powerful features, but may not be 100% debugged yet especially with PAL DVDs. If you don't mind testing out beta-level software, definitely give it a try. SpruceUp was basic but quite nice, however, due to corporate acquisitions, neither SpruceUp nor the more primitive DVD-Motion are available anymore. MyDVD has a slick interface but it is functionally quite limited, eg. won't let you use MPEG1 Layer2 audio so it's a non-starter in my book. Ulead has a DVD plug-in, bundled with MSP 6.5. I made a DVD using MSP 6.5's built-in encoder (Ligos LSX-MPEG) for conversion to MPEG2 (good quality) plus the DVD plug-in: it is easy to use, but limited: it permits only one video title with one menu to select chapter points, plus a separate first-play title (with no menu or chapters). Also, the plug-in's chapter-point selector seems buggy: you can manually enter timecodes ok, but it just freezes (permanently) if you try to interactively scroll the slider to select a chapter point. DVD-Lab came out of beta in May 2003 and is an inexpensive option, but check for compatibility before releasing a title with it. TMPGEnc DVD Author is rather basic and does not give you full control over menus. The most complete, full-featured DVD authoring tools are Sonic Scenarist (the professional standard- stunningly expensive, not a consumer item), and Spruce DVD Maestro (also pricey, and no longer sold). Sonic also sells some intermediate tools (below full Scenarist but above consumer-grade): ReelDVD and Scenarist Studio.
In the past I made my DVDs with AuthoringWare DVD Junior which has useable, but quite basic user interface (not as "slick" as some others). Before Ulead's DVD Workshop came out, DVD Junior was my choice of software. The full version of DVD Jr does have additional audio tracks (eg. director's commentary, or second language) and subtitles which DVD WS v.1.3 does not feature. Note, due to FAT32 filesystem limit of 4.2 GB (?) you cannot use quite all of the 4.5 GB of space on a DVD. If you use Windows 2000/ME/etc. with NTFS filesystem, this limit does not apply to you.
6) Having finished authoring your title by inserting chapter points, creating and linking menus and buttons with chapters, you export your finished video program from the authoring software. This creates a DVD file set on one of your hard drives: you will see VIDEO_TS and AUDIO_TS folders. AUDIO_TS contains nothing, it would be used in a DVD-AUDIO type disc. The authoring software converts your MPEG2 files (either elementary audio and video streams, or a pre-multiplexed system stream) to a program stream type with the VOB extension ("video object"), plus some other indexing files (IFO, BUP), all of which go in the VIDEO_TS folder. Many authoring programs are now offering the capability to burn a DVD directly but I wouldn't recommend that. I'd rather test-play my title from the hard drive first before taking the time to make an actual DVD.
7) Use a software DVD player (I find WinDVD is the best) to play your DVD production from disk, testing each menu, title and chapter to ensure your disc will work according to plan. WinDVD 4.0 can play the DVD from a VIDEO_TS folder directly. A player opening just an individual MPEG or VOB file will not show you the menus or correct chapter points.
8) Record the disc. Dust causes errors so make sure the disc is clean before putting it in the DVD burner. Using the Prassi PrimoDVD data writer utility which was bundled with the Pioneer drive, burn the VIDEO_TS and AUDIO_TS folders onto a DVD-R or DVD-RW disc. Prassi offers two variants of UDF Bridge filesystems for writing DVD-R discs, and I believe they both work. The A03 is a true 2x speed drive writing DVD-R, and it takes 28 minutes start to finish, to burn my larger DVD project (which used about 90% of the full available space on the disc). It is only 1x speed when writing DVD-RW, and 8x speed writing CD-R. Note that it is apparently only 1x if you use unapproved off-brand (cheaper) DVD-R media. I know it does work at 2x speed on Apple and Pioneer brand.
9) Insert finished disc in your DVD player and cross your fingers. So far I've burned about 60 DVD-R discs, mostly for my dance group. The home standalone DVD players generally work, even several year-old ones. Several older laptop DVD drives did not play. All the standalone players I tried at the local Fry's Electronics store worked on DVD-R (about 10 different models). Many players do show a brief glitch, for example a small blocky area for a few frames on any given disc, typically the areas with highest bitrate (fast motion). Often this is acceptable but be forewarned. You may be able to avoid this by restricting yourself to lower bitrates, for example 7 Mbps max.
This page has a list of players reported to be compatible with DVD-R, DVR-RW and DVD+RW media. The DVR-A03 writes DVD-R and DVD-RW (plus CD-R and CD-RW) but not DVD+RW or DVD+R. There is a review of DVD format and player compatibility published in the July 2002 issue of DV Magazine. They note that brand-name discs are more widely compatible than the cheaper no-name type, and DVD-R is more widely readable than DVD-RW or DVD+RW.
10) Labels: I would like to make nice printed labels to give a professional appearance to the product, but there are several problems. One, the manufactures of blank discs don't recommend it, claiming potential readback problems. Two, the clear labels I tried had a problem. There are several possible approaches, including a surprisingly inexpensive printer from Casio, see (see these notes). [4/2004] Epson now makes several printers (Photo 900, Photo 960, R200, R300) which can print directly on white coated "inkjet-printable" CDs and DVDs and the results look very good. But be careful, a damp finger can smudge the ink.
DVD Media: There is a difference.
NOTE! (05-31-2003) According to a Maxell representative, the "Maxell unbranded 2x DVD-R" media sold in 2003 by Meritline is not a genuine Maxell product. I have some more details here.
NOTE! (9-17-2002) If you have a Pioneer DVD drive including the DVR-A03, DVR-A04 and the "Superdrive" used in Mac computers, you must install this firmware update before using any 4x DVD-R or 2x DVD-RW media in your drive, or risk permanent hardware damage. This does not apply to the earlier 1x or 2x DVD-R media.
Ralph LaBarge, writing in DV Magazine did an excellent compatibility test using many different vendors of DVD-R and many different DVD players. He found DVD-R blanks from Maxell and TDK had the best compatibility with players, and generally speaking the cheapest brands (or no-name discs) were the worst performers. The full DVD Compatibility Test is online (free registration required.)
I have tried Taiyo-Yuden, Pioneer, Apple, Mitsui, Maxell, Ritek, and Meritline DVD-R media. The Mitsui brand did not work in most DVD drives I tested, the others worked almost everywhere. When you're testing different brands for playback, make sure that dust on the disc is not an issue. You can buy DVD-R media online from places like supermediastore or meritline.com.
Note, the Pioneer 103 and A03 DVD-R writers will only work at 2x speed with those specific brands of DVD-R media present on a list encoded in the firmware as acceptable for 2x speed writing. Apple and Pioneer brand work at 2x, many others (typically the "cheap" brands) are actually written at 1x speed. Pioneer does have a recommendation on which DVD-R brands to use for 2x burning: as of June 2002 they are: Pioneer, Verbatim, TDK, Mitsui, Maxell, Taiyo-Yuden, and Panasonic.
Note that Apple's new version of their DVD-R which I discovered on June 22 2002, needs updated firmware on the A03 to burn at 2x. The exterior packaging of a box of 5 is identical to the older version. I hate it when manufacturers do that. Anyway with the new firmware it burns at 2x and so far, it seems to play back just as well as the older type.
There are two types of DVD-R discs: General and Authoring. The Pioneer DVR-A03 drive writes only to DVD-General disks. The earlier, much more expensive Pioneer DVR-S201 drive writes to DVD-Authoring discs, which permit writing of extra data that a DVD replication house can use to generate the CSS (content scrambling system) data on the final discs.
DVD Compatibility: not perfect.
After making about 60 DVD-R discs and playing them on a number of different systems I have observed that about 90% of the players will work. That is to say, they appear to play the disc normally. BUT, half of those players will very occasionally show some blocky "glitches" on the video, due to playback errors. DVD-R media is not as reflective as standard silvery commercial DVD discs so the player has to work harder to read it, and there is a greater liklihood of errors particularly with fast-scan FF or REV play modes. Some players are "marginal" in that they play maybe half the DVD-R discs loaded and refuse to play others, even identical DVD-R media from the same box burned with the same video using the same program on the same hardware, or sometimes refusing to play the very same disc they played before. Go figure. For some reason, laptop computer DVD drives seem to have the most problems. Desktop PC DVD drives and standalone players seem better. I have found Pioneer brand DVD drives and standalones to be the most reliable (Pioneer was also the first to make a consumer DVD-R burner.)
DVD Quality. How good is it, really?
This is entirely dependent on your source material and your MPEG2 encoder. Noise does not compress well, so the video noise-reduction filter in TMPGEnc can help. Many encoders, for instance the one bundled with the A03 drive, produce disappointing quality. TMPGEnc at the 8000 kbps rate provides good results. With close attention you can see some difference and occasional slight artifacts on the DVD as opposed to the original DV material. Examining individual freeze-frames from fast motion sequences, the difference is quite obvious. Any time you change compression formats, you will have loss, but from the standpoint of a casual observer, I would say there is really little difference from DV original to MPEG2 on DVD.
My DVDs are clearly not as good as a Hollywood product. Apart from the production values and film quality itself, a 24 frame/sec image compresses better than a 60 field per sec. image. I have not done any hard-edged graphics, everything was slightly blurred for a cleaner look in the original DV. In general, still frames on the DVD look great; it's fast motion that shows the limits. It is definitely better than SVHS.
You can find out exactly how good a DVD will look (on a computer player, at least) right now, without spending any money. Just download the TMPGEnc encoder and compress some of your favorite DV footage to MPEG2, limiting yourself to 8000 kbps video bitrate. You can use the free trial version of WinDVD for display. It will only play back 5 minutes at a time but that's fine for this purpose. (WinDVD does on-the-fly deinterlacing for computer display, which works pretty well.)
Again, all the encoding affecting image and audio quality is done by TMPGEnc (or other MPEG2 encoder). The authoring software really just does stream multiplexing, formatting and menus in compliance with the DVD spec, and the DVD writer, while expensive, is simply a data transfer device. Video does show better colors on a good video monitor than a computer monitor, but if you have a S-video output on your PC card, you can connect a television monitor directly.
Can I use the DVR-A03 for general data backup, not just DVD video?
Yes, the Prassi PrimoDVD 2.0 application works just like (and in fact, is) a CD-R burner utility, which can also write DVD-R and DVD-RW discs. You can select any files and folders on your hard drive, or drag-and-drop them onto the program. DVD-R and DVD-RW discs each store 4,489.25 MB (that is 4,707,319,808 bytes, because 1K = 1024 bytes). The DVR-A03 also writes CD-R and CD-RW media, which stores about 650 or 700 MB per disc depending on the type.
My Pioneer DVR-A03 or DVR-103 is giving me strange errors when writing a disk.
Is Prassi PrimoDVD or other CD-R/DVD-R burning software giving you errors like these?
Data Job Untitled1 Terminated with errors. Error -10 at Sector 288 - Command: 2A Sense: 04 ASC:08 ASCQ:01
Data Job Untitled1 Terminated with errors. Error -10 at Sector 1376 - Buffer Underrun - Command: 2A Sense: 05 ASC:21 ASCQ:02
Check to see if you have DMA enabled for the DVD drive. My Athlon 1.5GHz machine would not write a CD-R disk at 8x speed in polled mode (PIO); a few MB into a write I'd get errors such as those above. Everything worked fine as soon as I turned on DMA on that IDE channel (Win2k). With Windows 2000, this is in Device Manager under IDE ATA/ATAPI controllers, for the IDE channel you're using. With Windows 98, the DMA checkbox is set under My Computer/Properties/Device Manager/ CDROM/Pioneer DVD-RW DVR-103.
DVD Technical Info
Broadly speaking, the DVD format offers the best audio and video quality generally available to the consumer, and also provides menu features not possible with tape-based media. This paper describes the features of the DVD format in general, but only a subset of these are currently available using authoring software affordable to consumers. There are two books often recommended for detailed DVD information: "DVD Demystified" by Jim Taylor and "DVD Authoring and Production" by Ralph Labarge.
The help file for "Mark's DVD Tray Player" contains an excellent reference for DVD structure and navigation commands, aimed at the DVD author, and Mark's Player itself is useful for testing and analysing your DVD. You can read about this software here. The dvd-replica.com site has a detailed view of DVD internal structures useful if you are doing complex authoring tasks. The DVD FAQ has a section on recordable DVDs and writers. In April 1996, Chad Fogg posted some technical notes to several newsgroups on the DVD specification and file formats, which are still the most detailed I've seen. You can find mostly the same information here at www.mpeg.org. dvdpro.com describes the packet structure of the DVD VOB files. This Pioneer website has a high-level overview of the DVD format.
Get answers to your DVD authoring questions at the Creative COW forum. You can find DVD authoring guides at dvdrhelp.com. The mpucoder site has some detailed information on DVD stream coding and also the freeware programs IfoEdit and VobEdit, which can display and even alter finished DVD project files at a very low level (the interface is similar to the Windows Registry Editor, and about as opaque if you aren't well versed in DVD file structures). At the lowest level, the flow of a DVD presentation is controlled by a command set which tells the player what video segment to present next. This site has a handy table of the DVD command set.
Wednesday, October 28, 2009
HOW TO: Autoplay Video CD (VCD) in Windows
Copyright 2002 The Navas GroupSM, All Rights Reserved.
Permission is granted to copy for private non-commercial use only.
Permission is granted to copy for private non-commercial use only.
Posted as <http://navasgroup.com/tech/autoplay_vcd.htm>. Updated: Saturday, October 17, 2009.
GENERAL NOTES:
- This information was compiled by the author and is provided as a public service. The author is not responsible for any errors or omissions, or for any consequential problems that might result. USE AT YOUR OWN RISK.
- Email comments and suggestions to John Navas
Introduction
A pure Video CD (VCD) will not Autoplay (automatically play the video on an inserted disc) in Microsoft Windows without some sort of "helper" application. Although there are several ways to create a Video CD that will Autoplay without a "helper" application, the following procedure, based on Windows Media Player, is arguably the simplest, easiest, and cleanest.
Requirements (player computer):
- Windows Media Player (6.4 or above; 7 or above recommended).
- Windows Me, Windows 2000, Windows XP (or later), or earlier versions of Windows with Internet Explorer 5 (or above).
Method
- Use an .ASX Windows Media Metafile (named VCD.ASX in this document, but any valid filename could be used) to control Windows Media Player.
- Use an AUTORUN.INF file to automatically launch the .ASX Windows Media Metafile.
Both of these two files must be placed in the root directory of the Video CD, as described below. They should not interfere with playing the Video CD on a Video CD or DVD player.
AUTORUN.INF
The contents of the AUTORUN.INF text file are always (assuming the .ASX file is named VCD.ASX):
| Method 1 | Comments |
[autorun] | The 2nd line (ShellExecute) uses the registered .ASX file association to process the .ASX Windows Media Metafile. The registered application is usually (but not necessarily) the current version of Windows Media Player; if so, playback begins in a default window. Method 1 is preferred unless you want playback to begin full screen, in which case use Method 2. |
| Method 2 | Comments |
[autorun] | Method 2 is used to begin playback full screen. It should explicitly invoke the older version (6.4) of Windows Media Player, which (unlike the latest version) supports the "/fullscreen" parameter. The older version apparently remains installed even when the newer version is installed (on Windows XP at least). |
.ASX file
The .ASX file contains text commands that allow you to control Windows Media Player. Simple examples:
| Play single video clip | Comments |
|
|
| Play two video clips | |
|
Creating the Video CD
Getting the .ASX Windows Media Metafile and the AUTORUN.INF file into the root directory of a Video CD can be easy or hard depending on the CD authoring software you use. In Nero Burning ROM (version 5) it's easy: after a Video CD compilation (layout) has been created, use the clip names in the "MPEGAV" folder (directory) to create the .ASX file, drag and drop the .ASX and AUTORUN.INF files into the upper right pane of the compilation window (set to "\" root), and then burn.
Sunday, October 18, 2009
Tuesday, October 6, 2009
Video basics
Video basics
When trying to understand how video is being stored and displayed we have to go back in time and look at a very outdated technology: The cathode ray tube television. Without giving a physics course a TV tube is a big piece of glass and no air inside. Inside we have a cathode emitting electrons when you heat it up (that's why it takes a while for the picture to show when you turn on your TV, the cathode first has to be heated up to the appropriate temperature to emit electrons). There also is a strong electromagnetic field which accelerates the electrons towards the front of the tube and the same electromagnetic field is also used to position the electron beam (there's a lot of electrons being fired towards the front of the tube). The front of the tube is phosphor-coated and when electrons hit it light will be emitted on the other side (that's the side where you're sitting on). Below you can see a schematic of a CRT.
At first TVs were only black and white so one electron beam was enough. Now, in order to display a picture you have to write it all over the screen so the electron beam has to sweep over the whole screen. The sweeping frequency is commonly known as refresh rate. The refresh rate was chosen according to the cycles of the electric systems being used: North America and part of Japan use 60 Hz, Europe, the middle East and parts of Asia use 50 Hz. This resulted in 2 competing TV systems:
NTSC: National Television Standard Committee. Also nicknamed Never the same color because no two NTSC pictures look the same. The NTSC system has 525 horizontal lines of which roughly 487 can be seen on screen and has a refresh ratio of 60 Hz interlaced (I'll get to that later on).
PAL: Phase Alternating Line. The PAL system has 625 horizontal lines of which roughly 540 can be seen on screen and a refresh ratio of 50 Hz interlaced.
Now, at the time when TVs first came to the market the technology to write 525 or 625 lines 60 respectively 50 times per second was prohibitively expensive and not suited for the mass market. Reducing the refresh ratio would have required more complicated circuits and wasn't an option either - plus the human mind has a lower limit as to what it accepts as fluent motion. But the TV engineers had an idea: What if we only wrote every second line of the picture during a sweep, and wrote the other half during the next sweep? Doing that we only need 25 respectively 30 pictures per second (meaning less bandwidth used meaning more TV stations in the same frequency band), and the human eye will still accept it as fluent motion. This idea of splitting up the image into two parts became known as interlacing and the splitted up pictures as fields. Graphically seen a field is basically a picture with every 2nd line black (or white, whatever you like better). But here's an image so that you can better imagine what's going on:
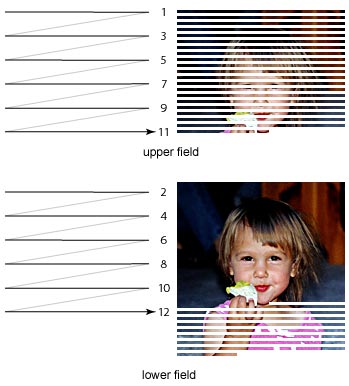 During the first sweep the upper field is written on screen. As you can see the first, 3rd, 5th, etc. line is written and after writing each line the electron beam moves to the left again before writing the next line.
As you can see on the left currently the picture exhibits a "combing" effect, it looks like you're watching it through a comb. When people refer to interlacing artifacts or say that their picture is interlaced this is what they commonly refer to.
Once all the odd lines have been written the electron beam travels back to the upper left of the screen and starts writing the even lines. As it takes a while before the phosphor stops emitting light and as the human brain is too slow instead of seeing two fields what we see is a combination of both fields - in other words the original picture.
When TVs finally got colored the interlacing technology stayed the same, but a more sophisticated cathode ray tube was required. Instead of emitting just one electron beam 3 electron beams in the colors red, green and blue are being emitted. When you place dots of different colors close enough together the human eye will no longer see individual dots but one single dot and will add the colors to create a new color. Below you can see the schema of a color CRT.
TVs use an additive color system to display all kinds of colors. For more information on additive color mixing please refer to the RGB World Color Info article.
In the NTSC world the switch to color required another change: The refresh rate had to be slightly lowered from 60 Hz to 59.97 Hz (resulting in 29.97 pictures per second) to accommodate the colors - that's why we have this strange framerates in the NTSC world today.
Now before we proceed to look how they shoot Hollywood movies let's have a look at PC monitors. The traditional PC CRT displays are fundamentally different from TV screens. When PC first came to the market it was finally possible to write a whole picture per sweep - also known as progressive scanning (scanning because the electron beam "scans" each line from left to right). Early PC monitors still supported interlaced modes but the higher contrast and bright backgrounds gave us such a headache that these days we are fortunate enough that most screens don't even support interlaced mode of operation anymore. Today all PC screens write a picture like this:

Recently there have been TV screens which support a progressive scanning mode. These models are very rare though and require that they are fed a different signal as the traditional ways of connect your VCRs, DVD players or cameras to the TV does not support progressive images. LCD and plasma displays can only write progressive images - when you feed them an interlaced image it requires some technical tricks to display a reasonable picture. These techniques are commonly referred to as deinterlacing.
A last word about TVs before we proceed: As you might recall older TVs had tubes that were far from being flat. As it gets more and more complicated to write a geometrically accurate and precise image the farther away you are from the center of the tube (the point where the electron beam would go straight to the phosphor layer without any deviation) even today you won't see the full tube, the last few inches are hidden behind the TV casing. That's the reason why both TV formats have more lines than you can see, the rest of the lines is and will always stay hidden. But these lines are still used: TV channels transmit text pages in these lines, they can contain signals that screws the automatic gain controller of your VCR (the Macrovision analogue copy protection system), etc.
Before we can go into deinterlacing there's a few things you should know about how movies are being shot.
Most movies destined for a movie theater audience are shot on a material similar to what we use for traditional photography. In a second 24 pictures are made from a scene. So, theoretically you can shoot a movie with your photo camera, except that you have to switch films every 1 or 1.5 seconds (and photo cameras usually don't support making 24 photos per second;). When we watch these movies in the movie theater we get to see 24 pictures (also known as frames) per second. But when we buy these movies on VHS tapes or DVDs to watch them on our crappy TV screens we have a problem. PAL screens require 25 pictures per second and each picture has to be split into 2 fields. But as 25 isn't so much higher than 24 what we commonly do in PAL countries is that we take the original 24 fps (frames per second) movie and speed it up to 25 fps. This means that voices and music has a higher pitch and that the movie is somewhat shorter but unless you do an one to one comparison hardly anybody notices.
Now enter NTSC. Here we need 29.97fps. Speeding up the movie is no option as the speed difference would be too large for people not to notice. So what's being done is that after splitting up frames into fields certain fields are being repeated to obtain the higher framerate. Basically 4 frames are turned into 10 fields as shown below:
 So, as you can see from the image contrary to what you might think a higher framerate doesn't mean more fluent motion - quite to the contrary NTSC is a bit more jerky as some fields are being displayed twice (the first field of frame 2, and the 2nd field of of frame 4).
On the TV this isn't so much of a problem as crappy quality prevents us from noticing that something isn't quite right. But things change when we switch into the progressive world.
In order to display things progressively your display or playback device somehow has to turn the interlaced picture back into a progressive one. The easiest way to do that is to combine fields.
From the 10 fields you put the first two fields together to reconstruct frame 1, then the 3rd and 4th field to reconstruct frame 2. But then if you put the 5th and 6th field together you get neither frame 2 nor frame 3. This isn't so bad if there was no change from frame 2 to 3, but if the camera moves you'll be able to see some combing lines in the picture. And it can get even worse. Imagine there's a cut in between the two frames and frame 3 shows a completely different scene than frame 2. If you combine a field of one scene with a field of another scene what you have is a disaster. So, by simply combining fields back to frames not only would we get 2 out of 5 frames that are screwed with high probability, we also have a 29.97fps picture instead of the original framerate of the movie. Now, if we know how this process works we can undo it by simply discarding the duplicate fields. This process is called IVTC - InVerse TeleCine (thus the process of inserting duplicate fields is called Telecine). There are two good articles which explain telecine and IVTC in more detail: Video and Audio synching problems by Robshot which explains the creation of telecined content in more detail, and Force Film, IVTC, and Deinterlacing - what is DVD2AVI trying to tell you and what can you do about it by hakko504, manono and jiggimi. There's also my own guide on Decomb, the probably most popular IVTC utility.
Now that we have IVTC out of the way let's have a more detailed look at deinterlacing. First let me present the problem once again:
First we have two fields from an interlaced video scene:


As you can see - no interlacing artifacts visible. Now the corresponding frame:
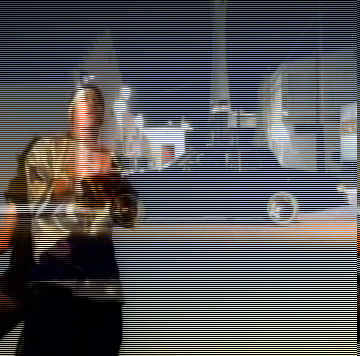
 Despite the low quality JPEG you can see that there are same interlacing lines visible, especially on the guy's clothes and arms.
And here's the even worse example where we have one field from one scene and the 2nd field from another scene:

And the corresponding frame:
 As you can see that's not something we want to experience. What's also interesting is the size of these images. The one on the left is more than 3 times as large as the rest, and it still looks worse.
This also explains why storing interlaced pictures in progressive mode isn't a good idea. Lines take up a lot of space.
VCD and common MPEG-4 codecs (except XviD) support only progressive content. Thus storing something interlaced as shown on the left using such a compression technique isn't very efficient and we rather look for ways of turning interlaced material into progressive in a more efficient way than just combining the next 2 fields to a frame.
MPEG-2 and MPEG-4 advanced simple profile do have a special interlaced mode. In that mode all the lines from one field are taken together (leaving out the blanks) and compressed that way which saves a lot of bits that would otherwise be wasted to store the missing lines.
A last note on these screenshots: As this was taken from an interlaced DVD source and stored in interlaced mode the screenshots of the fields had to be stretched to their original size (remember that in interlaced mode we only encode the actual lines, and dump the blank ones) - in reality the fields would be half the vertical size of the frames.
Now that we have visually established our problem let's have a look at the possible solutions. As illustrated taking the first two fields and combine them to a frame isn't always possible. This is especially true when you're dealing with content that has been edited when it was already in interlaced mode (that's also problem number one when trying to IVTC, especially Anime content is cut after telecining the film parts which results in almost insolvable IVTC problems).
One simple and quick way to get rid of the interlacing problem would be to take the field based content, resize the fields to full frame size (remember that a field has half the vertical resolution of a frame) and then dump every second field. This method is for instance used when you select Separate Fields in GordianKnot. But as a field has only half the vertical resolution of a frame we give up half of the vertical resolution in the process.
Now let's have a look at different deinterlacing techniques:
Weave: Takes 2 consecutive fields and puts them into a frame. This reduces the framerate by two but doesn't solve the problems shown above, the frame which has fields of two scenes overlayed remains the same.
Then we have blending: Here we take two consecutive frames, resize them to frame size, then put them on each other. If we have no motion this looks perfect but as soon as there's movement it starts to look unnatural and unsharp and it can leave a "ghostly trail".
Bob: In bob you enlarge each field to frame size and display it twice. As the first and second field do not start at the exact same position (remember that when we start at line 1 for field 1 and line 2 for field 2) the picture slightly bobs up and down which can be seen as a slight shimmering in stationary scenes.
There are a few more methods, like area based deinterlacing, motion blur and adaptive deinterlacing. Each has its pros and cons. 100fps.com has a nice comparison on all methods including good samples that show you the effects each filter has and has a nice feature comparison matrix. The site also guides you to create true 50fps progressive material from interlaced sources. If the site is too much to read for you (I doubt any Doom9 reader could ever say that but be that as it may) Gunnar Thalin's area based deinterlacer and DeinterlacePALInterpolation which is based on Thalin's filter are pretty good solutions when you need 25fps output. Then there's also Decomb's field deinterlace which proves to be quite effective.
Though before you deinterlace try swapping the field order first. DVD2AVI has a function for it (Video - Field Operations - Swap Field order) and so does AviSynth (SwapFields). Quite often that can solve your interlacing issues, especially when the main movie appears to be interlaced.
Parting words: This is by no means a complete technical description and it was written trying to recall all the classes in physics and video compression I have taken in high school and college. I hope my memory hasn't failed me too miserably.
what is Telecine
1. Do NOT use Panasonic to individually encode .wav to .mp2. The resulting .mp2 will not sync with intended video. Using DVMPEG to encode .wav to .mp2 (albeit quality is not as good as Panasonic), will create .mp2 audio that sync with video. But, if you put .avi and .wav to panasonic together, resulting .mpg will sync. Strange, eh?
Video and Audio Syncing Problem: Why and How.
Since the first release of Powerip in mid-1999, people have been experiencing the problem of determining the correct speed of video and audio when converting an NTSC mpeg-2 video/audio stream to any other format possible (e.g. mpeg-1, avi, asf, or divx) to get a perfect video and audio syncing.
This video and audio syncing problem is the result of an incorrect conversion of the mpeg-2 video stream (either using Powerip, mpeg2avi or any other conversion utility out there). This document is not meant to discard Squeezer or Flask, but it is in fact can be considered as a support so PERHAPS, the explanation can be applied to perfect-ize both Squeezer or Flask -- or even the AGrabber plugin. To be of note, there have been a lot of successful "synced" conversion made using utilities such as "SQUEEZER" and "FLASK". But there are some cases, where none of the conversion utilities produce a total "synced" video and audio.
Why? Let's see the process of transferring a 35mm film format to an NTSC video format, to see the root of this evil.
35mm Film to NTSC Video Conversion
Movie is usually made on a 35mm Film Negative. This format has a 24 FRAME per second speed. A Frame is the smallest unit of a FILM format. NTSC Video is a "field-based" format of 59.94 FIELD per second. A Field is the smallest unit in Video format. 2 Fields made up into 1 FRAME. So, this 59.94 FIELD per second equals 29.97 FRAME per second. Now we can see the difference. 1 second in FILM (24 frame) is NOT equal to 1 second in NTSC Video (29.97 frame).
To be able to "match" the speed of an NTSC Video, conversion from a FILM format to an NTSC Video format undergone a process called "2:3 pulldown" or TELECINE. This process, in its simplest term, means "to add 6 frames so that a 24 fps becomes 30fps -- which is VERY close to 29.97fps". The problem that rises when doing this TELECINE transfer, is to decide WHICH 6 FRAMES to be added - or REPEATED?
Some kind of community of film/moviemaker/videomaker/engineers created a STANDARDIZATION of this TELECINE conversion. Since a Video FRAME consist of 2 Fields, why not make the FILM format into Field first, so that the smallest unit of both formats is the same? Let's see the process:
1. 24 FRAMES becomes 48 FIELDS
| A | B | C | D |
| Atop | Abottom | Btop | Bbottom | Ctop | Cbottom | Dtop | Dbottom |
Frame A becomes 2 fields: Atopfield +Abottomfield. Thus, 4 Frames becomes 8 Fields, and 24 Frames becomes 48 Fields. This "field-based" material is then TELECINED into an NTSC Video signal. As TELECINE is a STANDARDIZED conversion, we have to follow the rules of engagement ;). The rule is to do a REPEAT_FIRST_FIELD in a 2:3 sequence.
2. 4 FRAMES (8 FIELDS) becomes 5 FRAMES (10 FIELDS)
| A | B | C | D |
| Atop | Abottom | Atop | Bbottom | Btop | Cbottom | Ctop | Cbottom | Dtop | Dbottom |
If we look closely, we can see a sequence of At Al At followed by Bl Bt then Cl Ct Cl then Dt Dl. But, since 1 FRAME consists of 2 FIELDS, then the sequence becomes AA ABBC CC DD. What we have now is a conversion from 4 SOLID frame into 5 FRAMES consisting of 3 SOLID FRAMES and 2 INTERLACED FRAMES. By INTERLACED I am referring to a FRAME that's made-up from 2 FIELDs of DIFFERENT FRAME source. The AB frame is the example.
So, 4 FRAMES becomes 5 FRAMES, thus 24 becomes..... 30, DONE! Done? Nope, not by a longshot. The NTSC Video is 29.97fps, so PLAYBACK of 30fps must be slow-down into 29.97fps, which brings us to the term DROP_FRAME.
Don't get a wrong concept of DROP_FRAME as "FRAMES being REMOVED or DROPPED". In a 30fps Video sequence, a DROP_FRAME time code counts video frames accurately in relationship to real time. DROP_FRAME time code counts each video frame, but, when that .03 finally adds up to a video frame, it skips (or drops) a number. It does not drop a film or video frame, it merely skips a number and continues counting. This allows it to keep accurate time. So if you're cutting a scene using drop frame time code, and the duration reads as, say, 30 minutes and 0 frames, then you can be assured the duration is really 30 minutes. Confusing? Well, to put it in simple term, DROP_FRAME here is in essence EQUAL a SLOWED_DOWN playback from a pure 30fps into the correct NTSC 29.97fps SPEED. In an MPEG-2 domain, this means that the 00 and 01 frames are dropped or SKIPPED from time code, at the start of each minute except minutes which are even multiples of 10.
NOW, it is DONE.
Telecine in MPEG-2 Video
In an Mpeg-2 Video, storing a 30fps frames in 1 second will create a much bigger files than storing a 24 frames. If you do your calculation, a 1 second of 24 frames is 20% SMALLER in SIZE than 1 second of 30fps. But, as we have already discussed, NTSC video should be 29.97fps. It would mean that ALL movies that's created from 35mm FILM should be TELECINED, then ENCODED to 29.97fps Mpeg-2 Video stream, right? ..... NO!
A good thing about Mpeg-2 Video is that it can contain some FLAGS or PROGRAMMING, that would tell a SOFTWARE or HARDWARE to perform a TELECINE when playing the Video. Since the INTERLACED FRAMES that made-up the 29.97fps is a REPEATED field(s), it is REDUNDANT, and TRASHABLE. Just let the FLAGS tells the player to perform the TELECINE. Really, it CAN do that ;). The benefit of this that the movie CAN be stored in its original 24 FRAME per second, and thus SAVE 20% of total filesize!.
The FLAGS related to this are: REPEAT_FIRST_FIELD, TOP_FIELD_FIRST. The rules of applying these FLAGS follows the STANDARDIZATION. So you don't have to worry about the process not meeting the standard :). Let see some example:
3. Adding T_F_F and R_F_F Flags
| Top Field First 1 | Top Field First 0 | Top Field First 0 | Top Field First 1 |
| Repeat First Field 1 | Repeat First Field 0 | Repeat First Field 1 | Repeat First Field 0 |
| A | B | C | D |
| Atop | Abottom | Atop | Bbottom | Btop | Cbottom | Ctop | Cbottom | Dtop | Dbottom |
As the we can see, a Value of 1 for both T_F_F and R_F_F will ORDER the player to DISPLAY FRAME A in a sequence of Atop Abottom Atop, and the Value of 0 both T_F_F and R_F_F will ORDER the player to display FRAME B in a sequence of Bbottom Btop.
When T_F_F is 0 and R_F_F is 1 (FRAME C), the player will display FRAME C in a sequence of Bbottom Btop Bbottom and so forth. Since it is a STANDARDIZED conversion, we can see a repeating Value of T_F_F and R_F_F as the following:
T_F_F sequence: 1 0 0 1 1 0 0 1 1 0 0 1 1 0 0 1 1
R_F_F sequence: 1 0 1 0 1 0 1 0 1 0 1 0 1 0 1 0 1
So, now we have an Mpeg-2 Video stream CONTAINING 24 FRAMES per second and TFF and RFF flags in action. This will create a CONFLICT between 24 fps versus 30fps and the VERBATIM 29.97fps NTSC Video standard. To solve this, there are 2 other advantages of Mpeg-2 Video stream than can be applied, the FPS flag and the DROP_FRAME flag.
When the FPS flag value is PROGRAMMED in the header of an Mpeg-2 Video stream, it will ORDER the player to PLAY this Video stream at an exact SPEED. So, if the FPS flag is set as 29.97fps, the Video stream will play at exactly 29.97 frames per second.
When the DROP_FRAME flag value is 1, it will ORDER the player to REMEMBER that the 00 and 01 frames are dropped at the start of each minute except minutes which are even multiples of 10. The result is much the same as applying the 29.97fps value.
So, THAT is how we make an Mpeg-2 NTSC video stream as 24 FRAME stored, but 29.97fps playback speed. Now that we understand the the process, we are ready to REVERSE it, in order to achieve total Video and Audio syncing when converting BACK from a 24-stored-29.97-fps Mpeg-2 Video stream into any video format we want.
How? Let start with "mpeg2avi", an utility that converts an Mpeg-2 Video stream into .avi format (with codecs of your choosing).
4. Mpeg2avi, VideoMatrix or Graphedit
After a careful reading to the readme.txt that comes with this utility, we can convert the Mpeg-2 Video stream into EXACTLY 24fps .avi. I am ASSUMING that mpeg2avi converts the FRAMES in DISPLAY_ORDER and not in CODED_ORDER. If the conversion is based on CODED_ORDER, then we are totally screwed.
Another way is to use VideoMatrix utility, that will convert an Mpeg-2 Video stream into .avi format BASED on the PLAYBACK of the Mpeg-2 Video stream. This utility ENSURES that the conversion is done in DISPLAY_ORDER.
Or, if you are quite familiar with Graphedit, you can use this utility to convert Mpeg-2 Video into .avi too. All of these three utilities MUST give you a full 720x480 .avi of 24 FRAMES per second. This 720x480 24fps is a REQUIREMENT.
5. M2VInfo
This utility is written to help analysing the FLAGS behaviour and values in an Mpeg-2 Video stream. It is a DOS command utility with usage as follow:
C:\M2VInfo filename.m2v > dump.txt
You can stop the process, because actually only the first GOP information is needed to determine the pattern of the FLAGS values and behaviour.
A sample of the dump.txt is as follow:Type 1 tff 1 rff 1 temp_reference 2
Type 3 tff 0 rff 1 temp_reference 0
Type 3 tff 1 rff 0 temp_reference 1
Type 2 tff 1 rff 0 temp_reference 5
Type 3 tff 0 rff 0 temp_reference 3
Type 3 tff 0 rff 1 temp_reference 4
Type 2 tff 0 rff 1 temp_reference 8
Type 3 tff 1 rff 1 temp_reference 6
Type 3 tff 0 rff 0 temp_reference 7
Type 2 tff 0 rff 0 temp_reference 11
Type 3 tff 1 rff 0 temp_reference 9
Type 3 tff 1 rff 1 temp_reference 10
Notes:
- Type-1 = I Frame
- Type-2 = P Frame
- Type-3 = B Frame
- temp_ref = DISPLAY ORDER
- rff = Repeat_First_Field flag
- tff = Top_Field_First flag
Now, what we need to do is to reconstruct the DISPLAY ORDER. I do this from the dump.txt above by rearranging the Frames according to the temp_ref. order
B B I B B P B B P B B P
Then, let's put the T_F_F and R_F_F in order too
0 1 1 0 0 1 1 0 0 1 1 0
1 0 1 0 1 0 1 0 1 0 1 0
Now we have the following sequence in DISPLAY_ORDER:
B B I B B P B B P B B P
0 1 1 0 0 1 1 0 0 1 1 0
1 0 1 0 1 0 1 0 1 0 1 0
Now, since we only want to know the CORRECT TELECINE sequence... just take the first 5 frames from the sequence above, and assume its an A B C D E sequence:
A B C D E
Apply the T_F_F and R_F_F values to the sequence above, and correctly follow the first T_F_F value, so we know which STARTING FIELD. I got this:
AlAu AlBu BlCu ClCu DlDu ElEu El
The STARTING_FIELD from above sequence is Al = Frame A lower field. Separate the sequence above into 1 frame (containing 2 fields), and we can calculate the TELECINE sequence within this .M2V as follow:
W S S W W W
So, the WSSWW sequence is the EXACT TELECINE sequence taking place in this particular .M2V
- The rest of the flags are also included, like FPS, DROP_FRAME etc. These are the determining factors to calculate the correct TELECINE Sequence used in a particular Mpeg-2 Video. There are 5 valid TELECINE sequences: WSSWW, SSWWW, SWWWS, WWWSS, WWSSW.
- W = Whole Frame
- S = Separate Field
From the dump.txt, we can now determine the TELECINE sequence to reconstruct the 2:3 pulldown into the 24fps avi. By this we MIMIC the actual DISPLAY_ORDER of the Mpeg-2 Video PLAYBACK into the AVI domain. In short, we CONVERT the 24fps avi into 29.97fps NTSC avi. It is important to apply the specific TELECINE sequence AND the correct STARTING FIELD. When the reconstruction gives lower_field as the BEGINNING of the DISPLAY_ORDER, we have to conform the conversion AS IS. Both the SPECIFIC TELECINE sequence and STARTING FIELD is IMPORTANT to create a 100% video and audio sync.
At the time of writing this document, I can only use Adobe After Effects to correctly convert the 24fps into 29.97fps while at the same time apply both determining factors above. Yes, you can do this directly in any ENCODER, but the applied conversion DOES NOT conform to the STARDARD TELECINE transfer. Encoders will apply a "4th frame repeated" calculation to get from 24fps to 29.97fps (30fps drop frame). Such conversion will be like this:
Current Encoders TELECINE creates: AA BB CC DD DD EE FF GG HH HH
Correct TELECINE Tranfer would be: AA AB BC CC DD EE EF FG GG HH
As you can see, even the STARTING FIELD factor is nowhere to be applied (panasonic encoder has this option, though). If this error is added to the whole 1 hour of Video conversion, Audio syncing WILL be screwed. This stated, I prefer to use Adobe After Effects (albeit it's a difficult program), UNTIL a new method can be found.
6. Adobe After Effects
This is the stage where I really can't explain much. You have to KNOW how Adobe After Effects works. That's why I really want to find a way to simplify this stage, or to put simply, NOT USE THIS ADOBE AFTER EFFECTS. But, as a quick referrence, what I do in After Effects is like this:
- Load the 24fps .avi
- Make a new composition of 29.97fps
- Import the 24fps .avi into the new composition.
- Set the determining factor of STARTING FIELD (top or bottom - in Adobe its UPPER or LOWER), and the correct TELECINE sequence (one of the following sequences: WSSWW, SSWWW, SWWWS, WWWSS, WWSSW).
- Render movie
All this steps are done in the 720x480 domain. The resulting rendered avi will be 29.97fps, accordingly conform to the SAME TELECINE transfer sequence that is programmed within the Mpeg-2 Video -- THE DISPLAY_ORDER. This avi will then become the source of the conversion to OTHER format, or if you choose DIVX codec from the start, you are now left with adding the Audio stream.
7. Converting the Audio
Use Graphedit to load any audio format. You have to edit the connection of the boxes in the Graphedit.
- Delete the RENDERER box
- Insert filters -- Audio Decompressor -- PCM
- Insert filters -- Directshow filters -- WAVE DEST
- Insert filters -- Directshow filters -- FILE WRITER (name it AUDIO.WAV)
- Connect the existing boxes to --- PCM --- WAVE DEST --- FILE WRITER
- Hit PLAY button
When it is finished, you now have 2 files: VIDEO.AVI and AUDIO.WAV. Now you decide what to do with it. You can:
8. Converting to Mpeg-1 with VideoCD compliant stream
- Load Panasonic Mpeg-1 encoder
- Input VIDEO.AVI and AUDIO.WAV
- Set conversion to VCD NTSC standard/template
- Set the MERGE/BLEND FIELD accordingly to the STARTING FIELD factor. If the original Mpeg-2 Video started with LOWER field, set the LOWER FIELD as the base of FIELD BLENDING in Panasonic. If the source Mpeg-2 Video is Anamorphic, add approriate BLACK BARS on TOP and BOTTOM of the VIDEO (66 and 67 is a good value).
- Hit start encoding.
At the end of the conversion, you will have a 29.97fps Mpeg-1 VCD Compliant (352x240), and to be of note: the panning video sequence will pan smoothly!
The advantage of a 29.97fps Mpeg-1 Video/Audio stream is that I can edit it in IFilm Mpeg-1 editor, while a 23.976fps Mpeg-1 cannot.
By writing this document, I am describing the situation as closely as I could to help answer the questions of Video and Audio syncing problem, and hope that a coder can help SIMPLIFYING the process. I know that SQUEEZER or FLASK have been reported to be able to create a TOTAL SYNC. But since there are some reports that tells otherwise, PERHAPS this document could help pointing the reason, and thus we can come up with a solution or two for PERFECT A/V syncing for ANY conversion.
Some of the ideas to jot down are as follow:
- Re-write mpeg2avi (source available) to NOT ONLY convert the CODED FRAMES in an Mpeg-2 Video. Meaning, that it should also take into account the TFF and RFF and DISPLAY_ORDER Values, so the conversion from 24 FRAMES Mpeg-2 Video into 29.97 fps avi can be achieved in 1 STEP. This will ensures less quality degredation. With the current conversion method I presents in this Document, from an Mpeg-2 Video to Mpeg-1 Video needs to go through 24fps avi --- 29.97fps avi -- then Mpeg-1.
- If the above is not possible, a guy has informed me about Frameserver capability in latest VDUB (v. 1.3a). With this, perhaps someone can write a 2:3 pulldown re-construction filter for VDUB, which will do a correct TELECINE reconstruction in VDUB. Such filter should includes a STARTING FIELD and TELECINE SEQUENCE options to be used to reconstruct a 24fps .avi into 29.97fps .avi according to the calculation from M2VInfo. Add this filter with the RESIZE filter currently available in VDUB, we can then START FRAMESERVING the avi, and then RUN LSX Mpeg Encoder by opening the FRAMESERVED .avi. With this, we can make CBR Mpeg-1 VCD compliant or CBR (and VBR) Mpeg-2 SVCD compliant Video. Note: This frameserver capability of VDub resides only in Win2K and NT operating system. I failed on Win98
- Write a 2:3 pulldown re-construction directshow filter for Graphedit, so we can go 1 step from Mpeg-2 Video Audio to DIVX or AVI.
Anyone up for the task?
regards,
robshot
DVD Ripper comparison
DVD Ripper comparison
There's currently a lot of DVD decryption programs "on the market". One of the favorite questions of a newbie is "Which ripper should I use" and everybody has its own opinion about that. Everybody has its own explanation why his particular choice is best, but there was no comprehensive comparison between the various ripping programs till now.
I have contacted each of the authors of these programs if possible, to ensure that the info about their program is as accurate as possible. Furthermore I've suggested some improvements, many of which you can already see in the current releases of the respective programs.
Since my first test there have been many updates to the program involved so I decided it was about time to have another comparison. As you'll see, there's many issues which toady's rippers now can deal with.. but there's new problems to be solved as well.
The participants
cladDVD XP 1.1
DVD Decrypter 3.1.1.0
SmartRipper 2.41
vStrip 0.8e_css
Where's the rest of the pack? Both DeCSS and DOD Speed ripper can't be used for most of the reasonably new discs. In the case of DeCSS we also have legal considerations to consider. Then there's vobdec and decss_plus which still are available on my page, but only listed on the source code page because nobody uses them anymore. But, keysearch algorithms from these 2 programs can be found in almost any modern ripper. I wanted to include DVD Decoder 0.3 but the program will crash upon starting up every time I tried it.
Test Setup
I've chosen a particularly tough setup, designed to push the programs to their limits. I have tested the programs with the following 8 DVDs:
My choices are based on the following:
The results
Death Row uncut:
Here I basically expect that the program detects that there's no CSS and immediately starts ripping instead of searching for a key. All programs were able to do so.
Raw Deal:
Here I tried to rip only the VOBs where vobdec keysearch will fail in order to ensure that another keysearch has been implemented that's able to take care of the problem. All the programs tested were able to find a key in every VOB file.
However, cladDVD XP can only rip full PGCs or the whole set of main movie files.
The Blair Witch Project
Here I tried to rip VOB2 and VOB4. I expect a key to be found as soon as possible. SmartRipper and DVD Decrypter have been able to find a key immediately. cladDVD XP can only rip full PGCs or all the main movie VOBs so this couldn't be properly tested but since it uses vStrip I would assume that it works anyway. vStrip did crash in the GUI mode, but worked in the command line mode, though it took rather long to find the key in the 2nd VOB.
Just Cause
Basically the key should be found in every VOB file as fast as possible. All application could do that, but once again with cladDVD XP we have the problem that we can't rip single VOBs.
The man with a golden gun
All the tested rippers were able to handle this movie properly when using the correct options which differ from the default options. In the case of cladDVD XP this was activating the mastering error option and using intense keysearch, for DVD Decrypter it was checking mastering errors, for SmartRipper it was setting keysearch to occur on each VOB ID and forcing the file access mode to ASPI and for vStrip setting the keysearch to occur at every VOB ID change (-r1 on the commandline).
Some more info about that title: The main movie is contained in vts_03_1.vob - vts_03_5.vob. In title1, chapter 21, cell 2 the key changes from C1 87 79 74 EE to C1 87 79 74 ED. That position can also be seen as VOB ID15, Cell 1, LBA 521277. vts_03_4/5.vob use the new key. The key change occurs at the layer change and all PC based DVD players are unable to play discs with such mastering errors. At the moment only vStrip_css, DVD Decrypter and SmartRipper will properly decrypt that title and only if you enable keysearch by VOB / Cell id. I was even unable to play the disc on my standalone. Interestingly PowerDVD 3.0 can play the disc, even tough there will be a couple of seconds of scrambled picture but at the VOB change it'll descramble with the new key, the same applies to WinDVD 2.4 and later.
Scary Movie
All rippers were able to give me the French credits when selecting the 2nd angle.
Additional info: The title contains 4 VOBs: vts_01_1.vob - vts_01_4.vob. The movie consists of VOB IDs 1-20, where ID 17 are the English credits and ID 18 are the French credits.
ID4
All programs gave the right output in both cases. I even crosschecked with older tests and the file were identical to the last byte.
A bit of additional information on that title: The movie consists of 8 VOBs: vts_04_1.vob up to vts_04_8.vob. It contains 106 cells and 34 VOB IDs. The special edition contains VOB IDs: 1,2,4,5,7,8,10,11,13,14,16,17,19,20,22,23,24,26,27,29,30,32,33 and the regular edition VOB IDs: 1,3,4,6,7,9,10,12,13,15,16,18,19,21,22,23,25,26,28,29,31,32,33. I split up the output of each program into cell IDs and compared them cell by cell (for size and name).
Sneakers
The UDF parser in WindowsXP can handle 1.00GB files so the test results may not apply for everybody but XP is getting more and more popular... All rippers were able to read the first VOB file despite its size.
Additional information: The first VOB file on the disc (vts_01_1.vob) is slightly larger than a regular VOB (explorer shows it as 1.00GB instead of the regular 0.99GB). As the Windows UDF parser cannot read such large files every program that uses that parser will fail to read that file. All programs that have their own UDF parser will succeed (assuming that it has been properly implemented).
Terminator 2: Ultimate Edition
All programs managed to extract all the different cuts of this movie.
Additional information on this title: The movie has 60 VOB IDs. The theatrical release comprises VOB IDs 1, 2, 4, 5, 6, 7, 8, 10, 12, 13, 14, 16, 18, 19, 20, 22, 23, 24, 25, 27, 28, 31, 32, 33, 35, 36, 3, 39, 40, 41, 43, 44, 45, 46, 48, 49, 50, 52, 53, 54, 55, 57 and 59. The director's cut is contained in VOB IDs 1, 2, 3, 5, 6, 7, 9, 10, 11, 13, 14, 15, 18, 19, 20, 21, 23, 24, 25, 26, 28, 29, 30, 32, 33, 34, 36, 37, 38, 40, 41, 42, 44, 45, 46, 47, 49, 50, 51, 53, 54, 55, 57, 58, 59. Finally the third cut just has a different ending than the director's cut so it is contained in the same VOB IDs as the director's cut but it contains VOB ID 56 instead of 55 as the other two releases.
Or here's the short version of the test
As we can see, the programs managed to handle my test discs admirably well. The only problem was that cladDVD XP didn't allow me to rip single files and screwed up the seamless branching titles.
Features overview
And there are a few noteworthy special features:
DVD Decrypter can rip the whole movie to an ISO file that can be mounted in daemon tool or burned on a DVD using a DVD recorder. Furthermore it can burn such images to a recordable DVD disc. It can also be used to change the region of your DVD drive and display the region code of the drive.
SmartRipper furthermore creates a detailed info file about all your VOBs contain, audio streams, subtitle streams, chapter positions, etc. as well as a DVD2AVI project file (though that functionality is far from perfect).
cladDVD XP allows you to select if you want to keep all audio track, or select the one you want to keep.
So which program is best? Judging by the number of x'es you'd have to say SmartRipper and DVDDecrypter. SmartRipper has been tested for a long time and it works in most cases, but it has its problems and that's why it's currently being completely rewritten. DVDDecrypter has probably been the most stable ripper and pretty much the only thing you can hold against it is that its IFO parsing hasn't been as extensively tested as the one in SmartRipper and vStrip though so far no serious problems have been reported. vStrip doesn't look so good in the feature comparison but it manages to handle all the disc and it was in fact the first ripper to handle all my test disc. I've used it pretty much since I started out ripping and when in doubt about the results I get from other programs I will continue to cross-check with vStrip. But vStrip is definitely not as user-friendly and is more a program for the experienced user. cladDVD XP is a pretty good GUI for vStrip and can safely be used as vStrip replacement when DVDDecrypter/SmartRipper fails and vStrip itself scares you away. When you encode using FlaskMpeg or make a rip to be burned onto a recordable DVD there's just one choice: DVD Decrypter. Just run the exe and press the big button and wait, that's all there is to it.
Speed testing
Of course, speed is of essence. Hence I ran all rippers to a small speed test. I ripped the first VOB of the main movie of "The Matrix", R1 release (a DVD-9) to my harddisk. The drive used was a Toshiba SDM-1212 12x DVD-ROM in Ultra DMA mode.
cladDVD XP: 2:35
DVD Decrypter: 1:33
SmartRipper: 1:41
vStrip: 2:21
DVD Decrypter leaves them all behind. SmartRipper gets reasonable close and half a minute separate vStrip and SmartRipper. I must say, the last time I did that test it looked considerably different. For vStrip I tested both GUI and CLI version just to make sure I got the results right. cladDVD cannot rip single files so I just waited till I had a 0.99GB VOB on my HD which isn't entirely fair but what can you do...
Wishes for the future:
There's several things I'd like to see in future rippers:
DVD Decrypter: can't think of anything right now..
SmartRipper: a more stable codebase, many people are having problems with SmartRipper (see my forums for details)
vStrip: splitting the output in accordance with the input VOBs, authentication
cladDVD XP: allow people to select VOB files by themselves, smaller filesize.
This document was last updated on 06/21/00
There's currently a lot of DVD decryption programs "on the market". One of the favorite questions of a newbie is "Which ripper should I use" and everybody has its own opinion about that. Everybody has its own explanation why his particular choice is best, but there was no comprehensive comparison between the various ripping programs till now.
I have contacted each of the authors of these programs if possible, to ensure that the info about their program is as accurate as possible. Furthermore I've suggested some improvements, many of which you can already see in the current releases of the respective programs.
Since my first test there have been many updates to the program involved so I decided it was about time to have another comparison. As you'll see, there's many issues which toady's rippers now can deal with.. but there's new problems to be solved as well.
The participants
cladDVD XP 1.1
DVD Decrypter 3.1.1.0
SmartRipper 2.41
vStrip 0.8e_css
Where's the rest of the pack? Both DeCSS and DOD Speed ripper can't be used for most of the reasonably new discs. In the case of DeCSS we also have legal considerations to consider. Then there's vobdec and decss_plus which still are available on my page, but only listed on the source code page because nobody uses them anymore. But, keysearch algorithms from these 2 programs can be found in almost any modern ripper. I wanted to include DVD Decoder 0.3 but the program will crash upon starting up every time I tried it.
Test Setup
I've chosen a particularly tough setup, designed to push the programs to their limits. I have tested the programs with the following 8 DVDs:
- Death Row Uncut, R0, not encrypted
- Raw Deal, R1, encrypted
- The Blair Witch Project, R1, encrypted
- Just Cause, R1, encrypted
- The man with the golden gun, R1, encrypted
- Scary Movie, R1, encrypted
- Independence Day, R1, encrypted
- Sneakers, R1, encrypted
- Terminator 2 Ultimate Edition, R1, encrypted.
My choices are based on the following:
- In order to correctly deal with unencrypted movies the ripping program should incorporate some sort of CSS detection in order not to search all VOBs for keys.
- VobDec is unable to detect a key in vts_01_1.vob, vts_01_2.vob, vts_01_4.vob and vts_01_5.vob of Raw Deal
- VobDec is unable to detect a key in vts_01_2.vob and vts_01_4.vob of Blair Witch Project. Furthermore DeCSS+ only finds 4 key occurrences in vts_01_2.vob and exactly 20 in vts_01_4.vob.
- VobDec is unable to detect any key in Just Cause
- The man with the golden gun has a mastering error: At the layer change the VOBs use a different CSS code. To make things worse the key changes not between VOBs but within a VOB file.
- Most Disney titles have title and end credits in at least 2 languages interleaved with each other resulting in a few seconds English, then a few seconds of French/Spanish titles. Here I was looking to get the French end credits.
- Independence Day is a seamless branching title and contains both the special edition and the theatrical version on the same disc. A good ripper allows you to select either of these versions.
- Sneakers has one VOB file which is exactly 1.00GB large (Explorer shows it as 1.00GB, not 0.99GB like the others) and the Windows UDF parser can't read that kind of file.
- Terminator 2 UE has 3 different versions of the movie on the disc. The goal is to be able to select the longest of the 3 cuts.
The results
Death Row uncut:
Here I basically expect that the program detects that there's no CSS and immediately starts ripping instead of searching for a key. All programs were able to do so.
Raw Deal:
Here I tried to rip only the VOBs where vobdec keysearch will fail in order to ensure that another keysearch has been implemented that's able to take care of the problem. All the programs tested were able to find a key in every VOB file.
However, cladDVD XP can only rip full PGCs or the whole set of main movie files.
The Blair Witch Project
Here I tried to rip VOB2 and VOB4. I expect a key to be found as soon as possible. SmartRipper and DVD Decrypter have been able to find a key immediately. cladDVD XP can only rip full PGCs or all the main movie VOBs so this couldn't be properly tested but since it uses vStrip I would assume that it works anyway. vStrip did crash in the GUI mode, but worked in the command line mode, though it took rather long to find the key in the 2nd VOB.
Just Cause
Basically the key should be found in every VOB file as fast as possible. All application could do that, but once again with cladDVD XP we have the problem that we can't rip single VOBs.
The man with a golden gun
All the tested rippers were able to handle this movie properly when using the correct options which differ from the default options. In the case of cladDVD XP this was activating the mastering error option and using intense keysearch, for DVD Decrypter it was checking mastering errors, for SmartRipper it was setting keysearch to occur on each VOB ID and forcing the file access mode to ASPI and for vStrip setting the keysearch to occur at every VOB ID change (-r1 on the commandline).
Some more info about that title: The main movie is contained in vts_03_1.vob - vts_03_5.vob. In title1, chapter 21, cell 2 the key changes from C1 87 79 74 EE to C1 87 79 74 ED. That position can also be seen as VOB ID15, Cell 1, LBA 521277. vts_03_4/5.vob use the new key. The key change occurs at the layer change and all PC based DVD players are unable to play discs with such mastering errors. At the moment only vStrip_css, DVD Decrypter and SmartRipper will properly decrypt that title and only if you enable keysearch by VOB / Cell id. I was even unable to play the disc on my standalone. Interestingly PowerDVD 3.0 can play the disc, even tough there will be a couple of seconds of scrambled picture but at the VOB change it'll descramble with the new key, the same applies to WinDVD 2.4 and later.
Scary Movie
All rippers were able to give me the French credits when selecting the 2nd angle.
Additional info: The title contains 4 VOBs: vts_01_1.vob - vts_01_4.vob. The movie consists of VOB IDs 1-20, where ID 17 are the English credits and ID 18 are the French credits.
ID4
All programs gave the right output in both cases. I even crosschecked with older tests and the file were identical to the last byte.
A bit of additional information on that title: The movie consists of 8 VOBs: vts_04_1.vob up to vts_04_8.vob. It contains 106 cells and 34 VOB IDs. The special edition contains VOB IDs: 1,2,4,5,7,8,10,11,13,14,16,17,19,20,22,23,24,26,27,29,30,32,33 and the regular edition VOB IDs: 1,3,4,6,7,9,10,12,13,15,16,18,19,21,22,23,25,26,28,29,31,32,33. I split up the output of each program into cell IDs and compared them cell by cell (for size and name).
Sneakers
The UDF parser in WindowsXP can handle 1.00GB files so the test results may not apply for everybody but XP is getting more and more popular... All rippers were able to read the first VOB file despite its size.
Additional information: The first VOB file on the disc (vts_01_1.vob) is slightly larger than a regular VOB (explorer shows it as 1.00GB instead of the regular 0.99GB). As the Windows UDF parser cannot read such large files every program that uses that parser will fail to read that file. All programs that have their own UDF parser will succeed (assuming that it has been properly implemented).
Terminator 2: Ultimate Edition
All programs managed to extract all the different cuts of this movie.
Additional information on this title: The movie has 60 VOB IDs. The theatrical release comprises VOB IDs 1, 2, 4, 5, 6, 7, 8, 10, 12, 13, 14, 16, 18, 19, 20, 22, 23, 24, 25, 27, 28, 31, 32, 33, 35, 36, 3, 39, 40, 41, 43, 44, 45, 46, 48, 49, 50, 52, 53, 54, 55, 57 and 59. The director's cut is contained in VOB IDs 1, 2, 3, 5, 6, 7, 9, 10, 11, 13, 14, 15, 18, 19, 20, 21, 23, 24, 25, 26, 28, 29, 30, 32, 33, 34, 36, 37, 38, 40, 41, 42, 44, 45, 46, 47, 49, 50, 51, 53, 54, 55, 57, 58, 59. Finally the third cut just has a different ending than the director's cut so it is contained in the same VOB IDs as the director's cut but it contains VOB ID 56 instead of 55 as the other two releases.
Or here's the short version of the test
| cladDVD XP | DVD Decrypter | SmartRipper | vStrip | |
| Death Row Uncut | x | x | x | x |
| Raw Deal | (x) | x | x | x |
| The Blair Witch Project | (x) | x | x | x |
| Just Cause | (x) | x | x | x |
| The man with a golden gun | x | x | x | x |
| Scary Movie | x | x | x | x |
| ID4 | x | x | x | x |
| Sneakers | x | x | x | x |
| T2UE | x | x | x | x |
As we can see, the programs managed to handle my test discs admirably well. The only problem was that cladDVD XP didn't allow me to rip single files and screwed up the seamless branching titles.
Features overview
| cladDVD XP | DVD Decrypter | SmartRipper | vStrip | |
| detects CSS | x | x | x | x |
| VobDec keysearch | x | x | x | x |
| DeCSS+ keysearch | x | x | x | x |
| Demacro | x | x | x | x |
| Regionfree | x | x | x | - |
| adjustable keysearch | x | x | x | x |
| drive authentication | x | x | x | - |
| selects main movie | x | x | x | x |
| copies ifo of main movie | - | x | x | - |
| multiangle processing | x | x | x | x |
| multiangle disable | x | x | x | x |
| one button movie rip | x | x | x | - |
| IFO parsing | x | x | x | x |
| standalone program | - | x | x | x |
| stream processing | - | x | x | x |
| UDF parser | (x) | x | x | x |
| ripping by chapter | - | x | x | (x) |
| calculate stream delays | - | x | x | x |
DVD Decrypter can rip the whole movie to an ISO file that can be mounted in daemon tool or burned on a DVD using a DVD recorder. Furthermore it can burn such images to a recordable DVD disc. It can also be used to change the region of your DVD drive and display the region code of the drive.
SmartRipper furthermore creates a detailed info file about all your VOBs contain, audio streams, subtitle streams, chapter positions, etc. as well as a DVD2AVI project file (though that functionality is far from perfect).
cladDVD XP allows you to select if you want to keep all audio track, or select the one you want to keep.
So which program is best? Judging by the number of x'es you'd have to say SmartRipper and DVDDecrypter. SmartRipper has been tested for a long time and it works in most cases, but it has its problems and that's why it's currently being completely rewritten. DVDDecrypter has probably been the most stable ripper and pretty much the only thing you can hold against it is that its IFO parsing hasn't been as extensively tested as the one in SmartRipper and vStrip though so far no serious problems have been reported. vStrip doesn't look so good in the feature comparison but it manages to handle all the disc and it was in fact the first ripper to handle all my test disc. I've used it pretty much since I started out ripping and when in doubt about the results I get from other programs I will continue to cross-check with vStrip. But vStrip is definitely not as user-friendly and is more a program for the experienced user. cladDVD XP is a pretty good GUI for vStrip and can safely be used as vStrip replacement when DVDDecrypter/SmartRipper fails and vStrip itself scares you away. When you encode using FlaskMpeg or make a rip to be burned onto a recordable DVD there's just one choice: DVD Decrypter. Just run the exe and press the big button and wait, that's all there is to it.
Speed testing
Of course, speed is of essence. Hence I ran all rippers to a small speed test. I ripped the first VOB of the main movie of "The Matrix", R1 release (a DVD-9) to my harddisk. The drive used was a Toshiba SDM-1212 12x DVD-ROM in Ultra DMA mode.
cladDVD XP: 2:35
DVD Decrypter: 1:33
SmartRipper: 1:41
vStrip: 2:21
DVD Decrypter leaves them all behind. SmartRipper gets reasonable close and half a minute separate vStrip and SmartRipper. I must say, the last time I did that test it looked considerably different. For vStrip I tested both GUI and CLI version just to make sure I got the results right. cladDVD cannot rip single files so I just waited till I had a 0.99GB VOB on my HD which isn't entirely fair but what can you do...
Wishes for the future:
There's several things I'd like to see in future rippers:
DVD Decrypter: can't think of anything right now..
SmartRipper: a more stable codebase, many people are having problems with SmartRipper (see my forums for details)
vStrip: splitting the output in accordance with the input VOBs, authentication
cladDVD XP: allow people to select VOB files by themselves, smaller filesize.
This document was last updated on 06/21/00
Subscribe to:
Comments (Atom)

Popular Posts
-
 S L E E P I N G S O U N D S 🎼 🎙 Song : Rasathi Movie : Aravindante Athidhikal Music : Shaan Rahman Singers : Vineeth Sreenivasan an...
 -
1. Do NOT use Panasonic to individually encode .wav to .mp2. The resulting .mp2 will not sync with intended video. Using DVMPEG to encode .w...
-
Aspect ratios A DVD video stream is 720x480, right? But 720/480 = 1.5 which is an impossible aspect ratio for a movie. And what about full s...

